
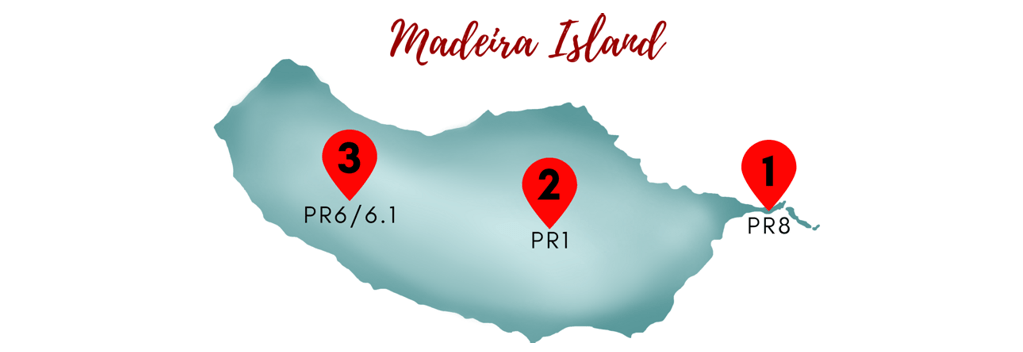
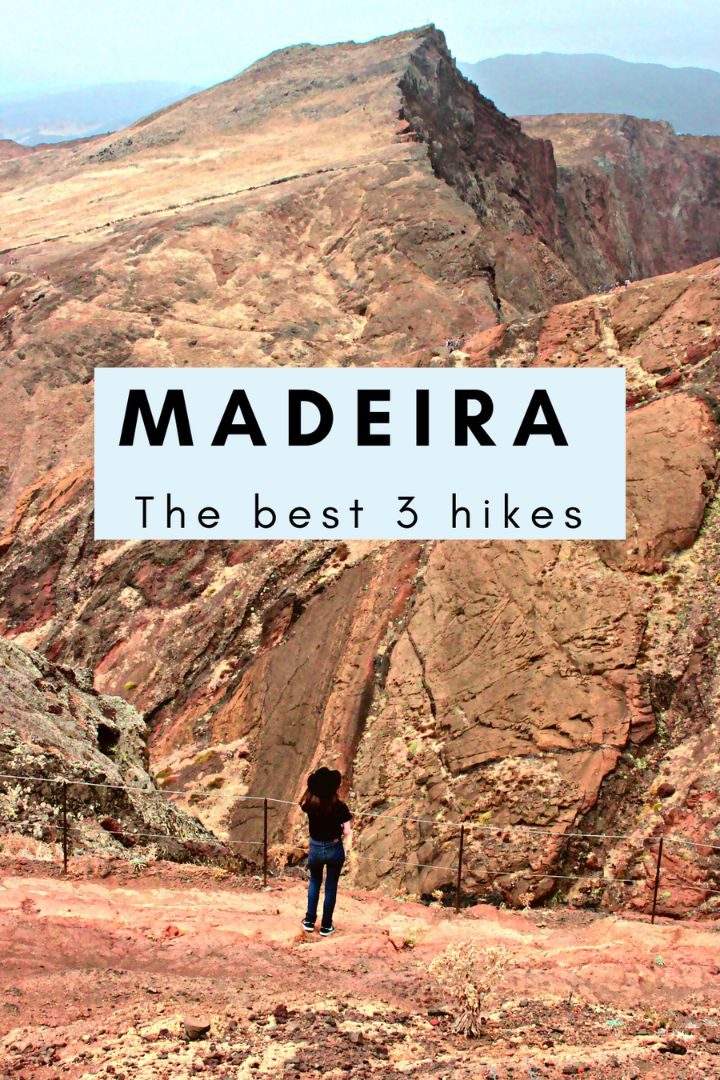
Madeira Island is very famous for its hiking trails. Madeira has more than 1300 miles (2000 km) of hiking trails on the island and hundreds of walks that you can do. In this blog post, I’m going to show you three of the most amazing hiking trails famous on the island. These three hiking trails couldn’t be different from each other.
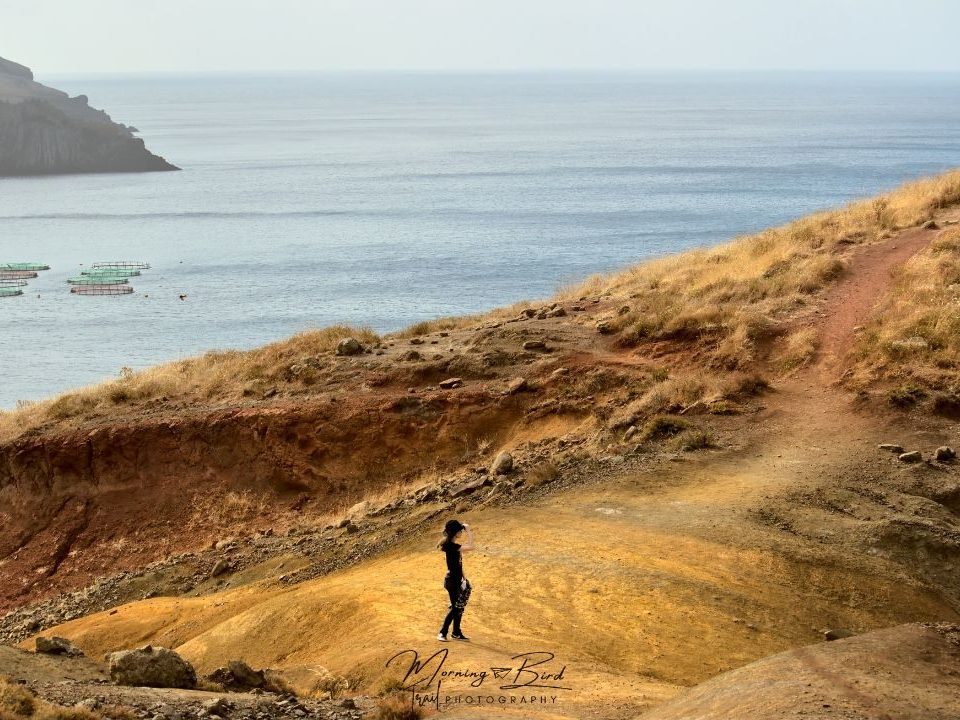
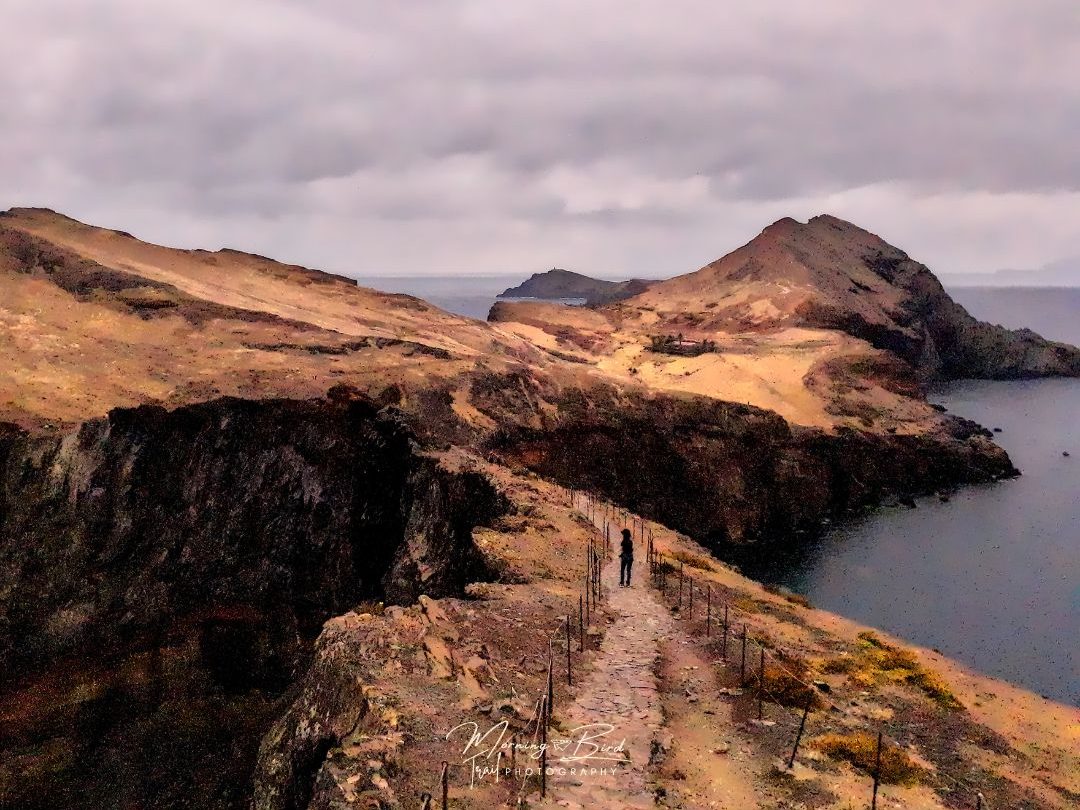
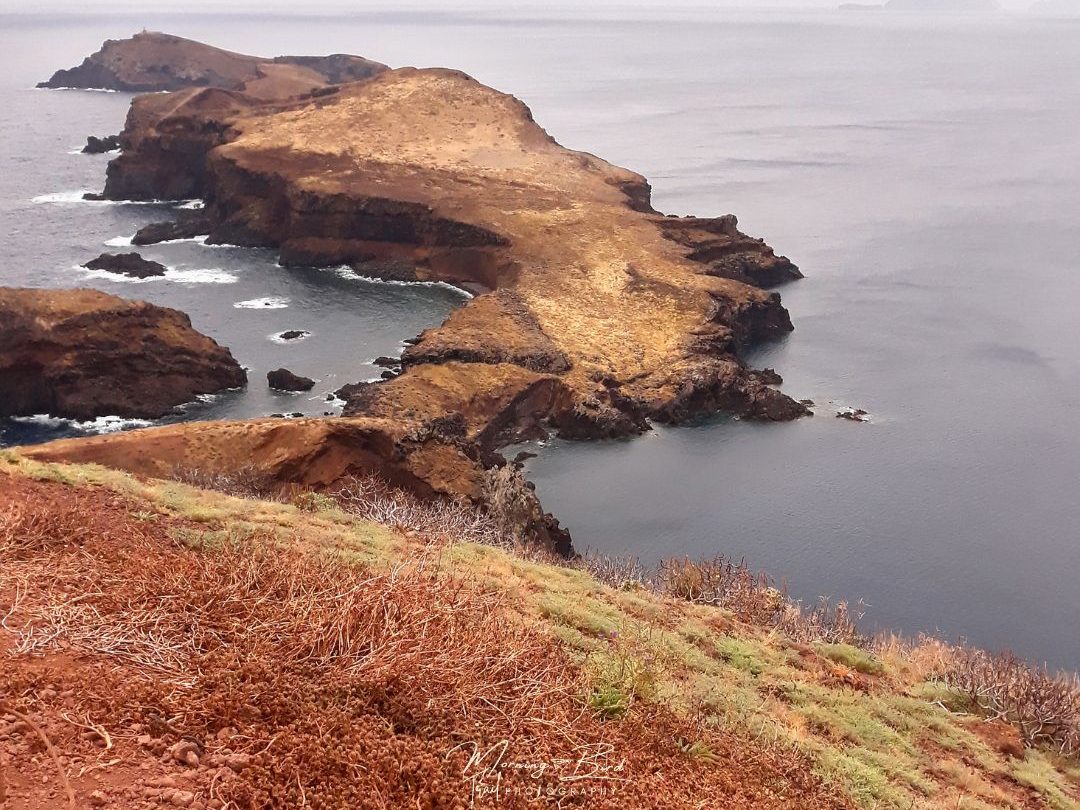
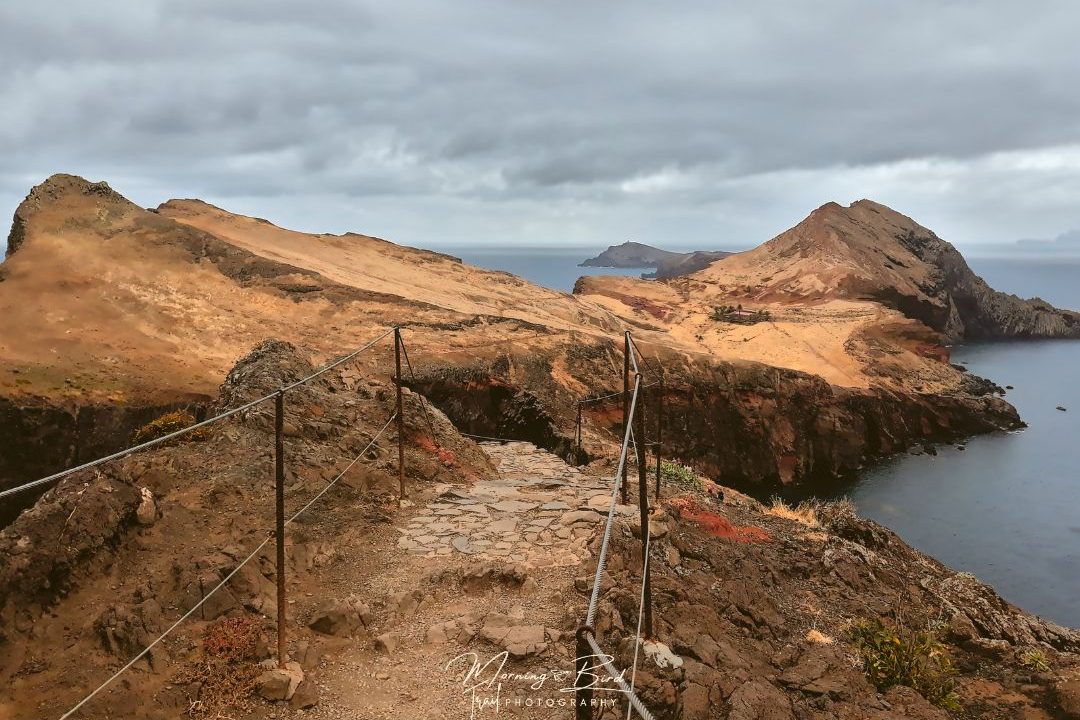
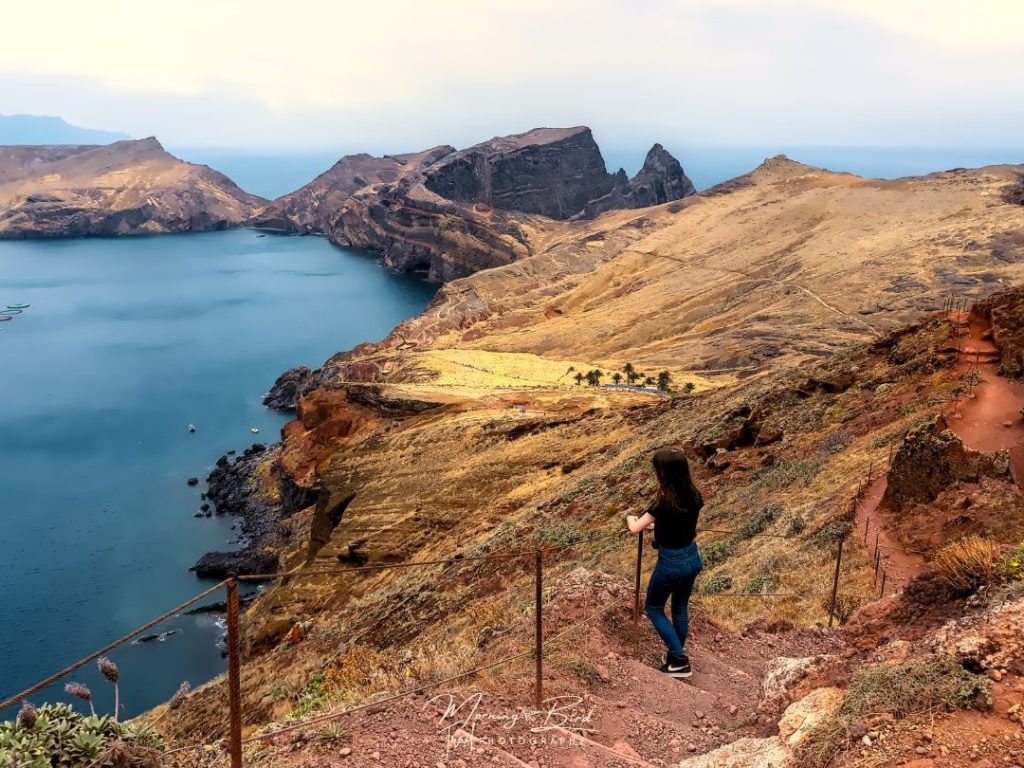
Ponta de São Lourenço hiking trail is located on the eastmost side of the island, in a place of extreme weather conditions, way dryer and windy than the rest of the island. For this reason, the landscape is way different from the postcards that we usually see of the island, with amazing forests. In this hike, you’ll see the cliffs of Ponta de São Lourenço and the low vegetation covering the rocks.
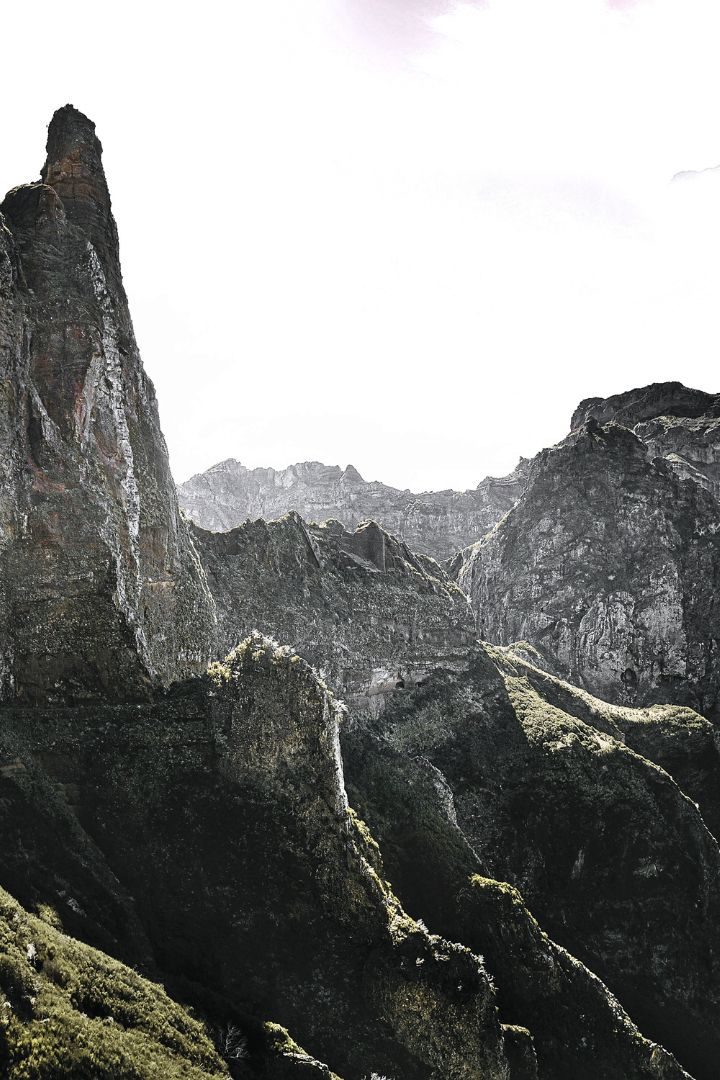
Pico do Arieiro to Pico Ruivo hike is probably the most famous and tough of all hiking trails in Madeira. In this hike, you’ll walk above 1500 meters high, up and down through the highest peaks on the island. You’ll be amazed by the views, but the tough and the high hike is not for everyone.
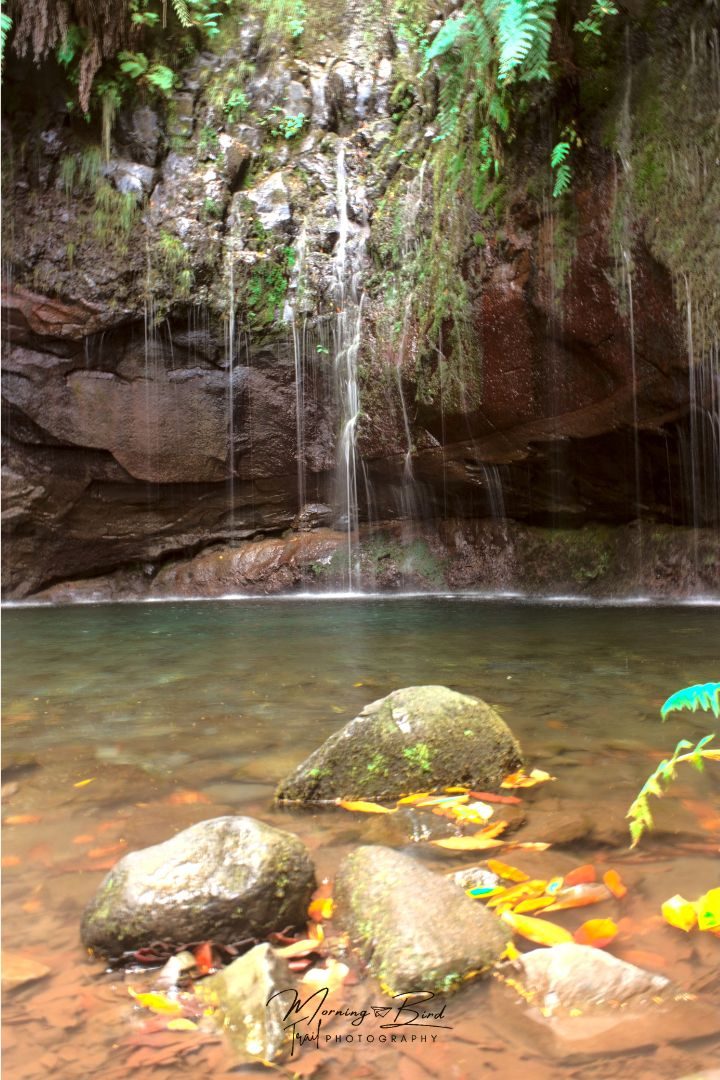
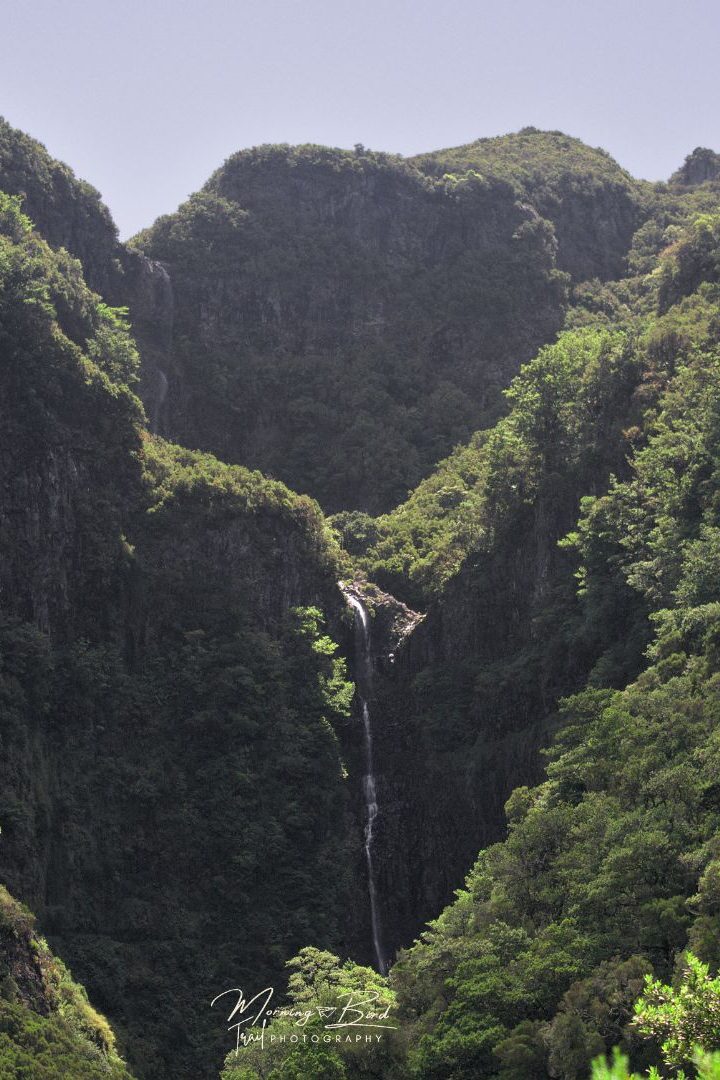
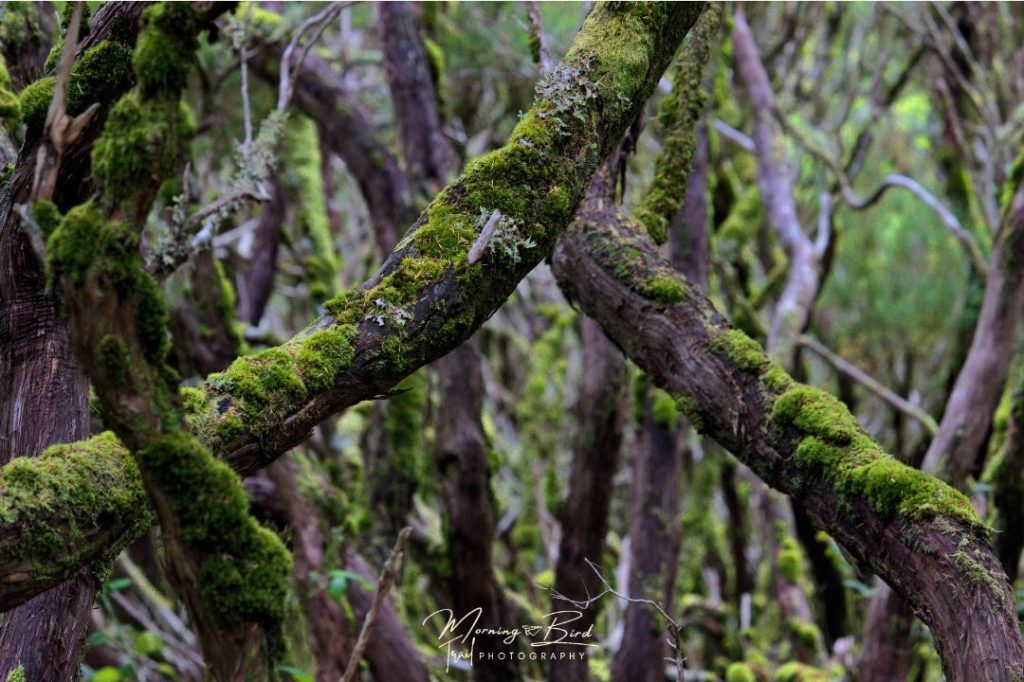
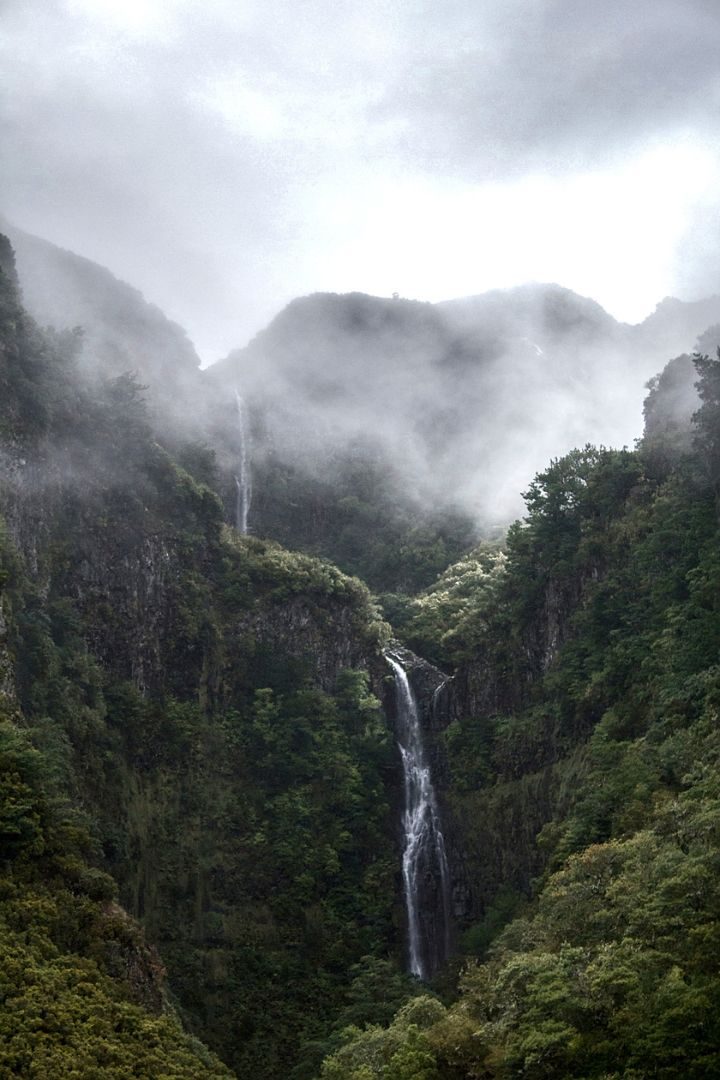
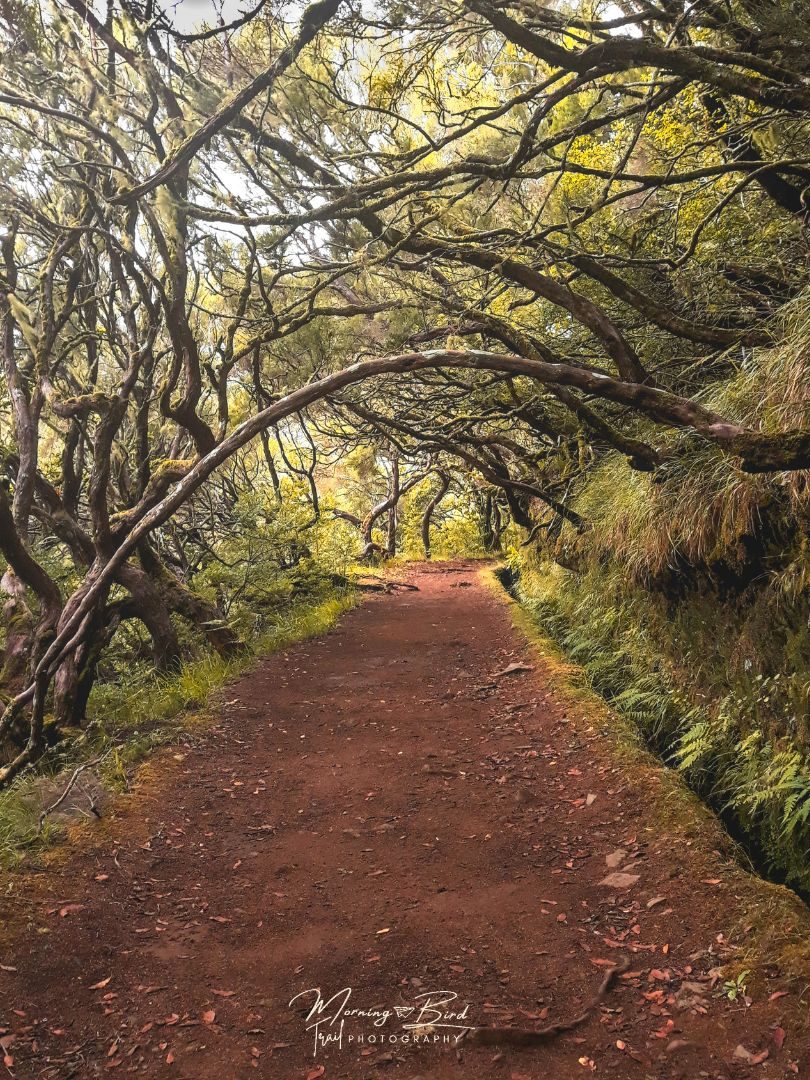
Levada das 25 Fontes hike is a Levada through the landscape that we associate the most to Madeira, the Laurissilva Forests. This is a refreshing hike, through beautiful forests side by side to a Levada (A Levada is a channel that directs water from one place to another, typical from the north part of the island, more humid, to the south). In this hike, you’ll also be surprised with waterfalls, such as the 25 Fontes and the Risco waterfall.
Overview
In a hurry? Pin it for later:


1 – PR8: Ponta de São Lourenço
- Key details about the Ponta de São Lourenço hike
- How to get to Ponta de São Lourenço?
- What is the best time to hike Ponta de São Lourenço?
- What should you expect in the Ponta de São Lourenço hike?
- What are the highlights of Ponta de São Lourenço?
This hike explores the east peninsula of Madeira. This region is very different from the rest of the island because its climate is semi-arid. This means that there are very few plants, all of them quite small. This is mostly because of the harsh weather, in particular, the strong winds felt in the region.
Key details about the Ponta de São Lourenço hike:
The Ponta de São Lourenço hike is a 3.5 km (each way) hike that you can do on the east most side of Madeira Island. The hike starts in Baía d’Abra and finishes in Casa do Sardinha (one way).
You can do this hike in around 3 hours, less if you don’t stop at all, or more, if you do long stops, for example, in the restaurant, in the middle of the round hike.
The hike isn’t too hard, but it does have a few ups and downs that may seem harder. Also, sometimes you are walking on rocks which may be scary. The trail is easy to identify but, in some parts, can be scary because of the wind.
The wind is the trickier part of this trail since it is so unprotected from the wind. The problem with the wind is that on days when it is strong, it can make you almost fall. This is particularly scary when you remember that there are big cliffs near you.
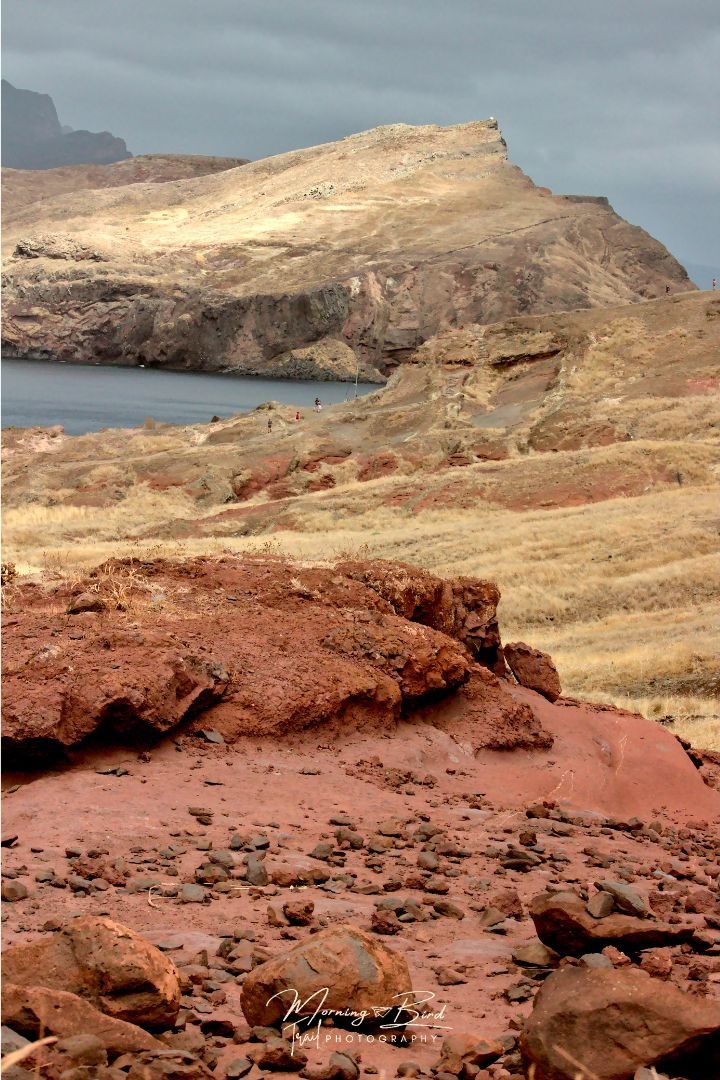
At the end of the official hiking trail, you’ll find a part of the trail that is advised against because of its low maintenance and danger. Despite this, you’ll see many people climbing the peak to get to the Miradouro Ponta do Furado viewpoint. This part of the hike is hard because you are constantly going up and the stairs are really degraded (some have even disappeared) and sometimes the hand railing is gone too, in particular, at the top of the viewpoint, part of it is on the floor.

How to get to Ponta de São Lourenço?
It is easy to get to the beginning of the hike. You can drive there (if you rented a car), which takes around 30 minutes from Funchal. The trail starts near a roundabout (coordinates: 32.743196, -16.701097), near where you can park easily in the parking lot.
In this roundabout, you can usually find food trucks that may be useful in the end if you need water or want ice cream.
What is the best time to hike Ponta de São Lourenço?
There are a few things to consider when choosing the best time to hike Ponta de São Lourenço. The weather is the most important one. It is better to hike in the morning or afternoon. This is because there is no shade at all in the hiking trail since there are no tall plants there. As a result, in the middle of the day, the temperature may get quite high. This fact makes the hike more difficult at this time of the day.
Another thing to consider is the wind. The best time to hike Ponta de São Lourenço is on a less windy day. This is because hiking the Ponta de São Lourenço trail on a windy day is more scary and dangerous than in a day that has no wind. The wind in the region can get quite strong and may unbalance you while you walk.
What should you expect in Ponta de São Lourenço hike?
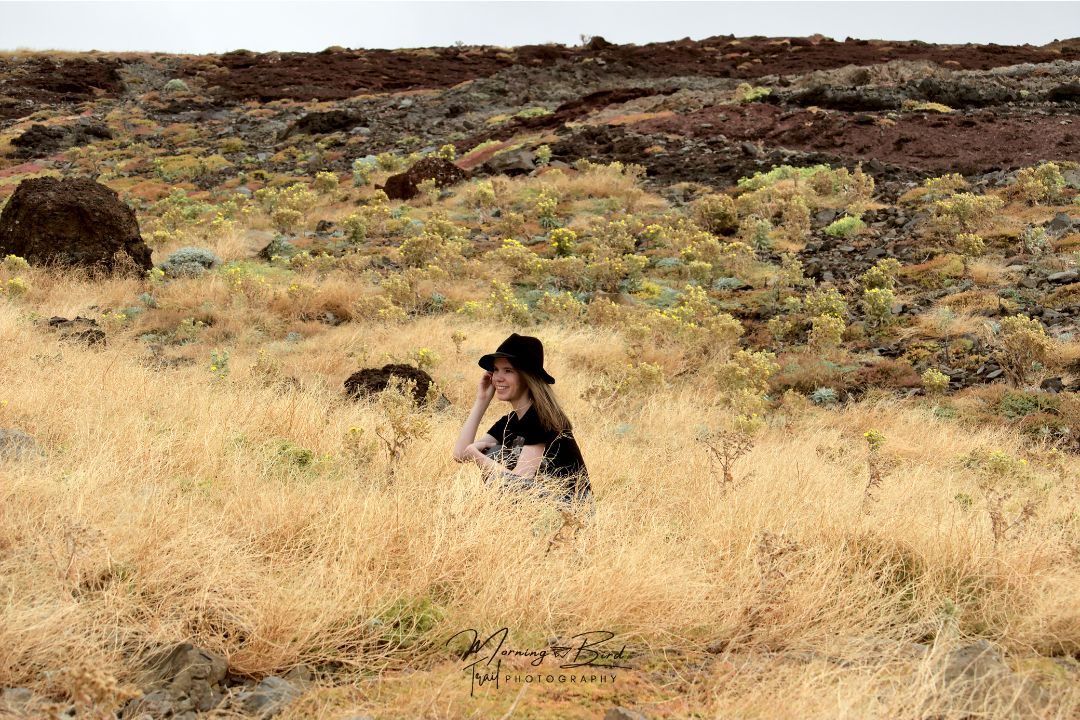
In terms of the landscape, your expectations depend mostly on the time of the year. In the Summer, you will find beautiful golden rocky formations because the plants on the peninsula are dry. In the rainier months, however, the grass gains life and paints the scenery green. This landscape kind of resembles Iceland or Faroe Islands.
If there is sun, you should expect high temperatures and a constant sun hitting you. This means that it is important to bring to this hike sunscreen and a hat to protect your skin and head (hopefully the hat won’t be blown by the wind).
After an initial walk in a wooden section of the hike, you’ll step your foot on the first rocks of Ponta de São Lourenço and start to see the incredible cliffs and hills around you.
In this hike, you can also get to a few rocky beaches if you follow the stairs that get you there.
At the end of the one way hike, you’ll see a sort of oasis with palm trees and a little house. That is the Casa da Sardinha, a place where you can buy food and drinks and use the bathroom (paid) if you wish to. The house has a very nice zone with tables and chairs where you can stop and eat some food (that you may need to share with pigeons). It is also worth noting that there are other places for you to sit and eat that are not at the bar (you can find them if you follow the “Cais” route at the end).
At this stop, there will probably be people trying to sell you a return trip by boat. This trip may also show you several parts of the cliffs from the sea. So, if you are interested in that and want to go back in 10 or 20 minutes rather than 1h30, you may try to find them if they don’t find you first.
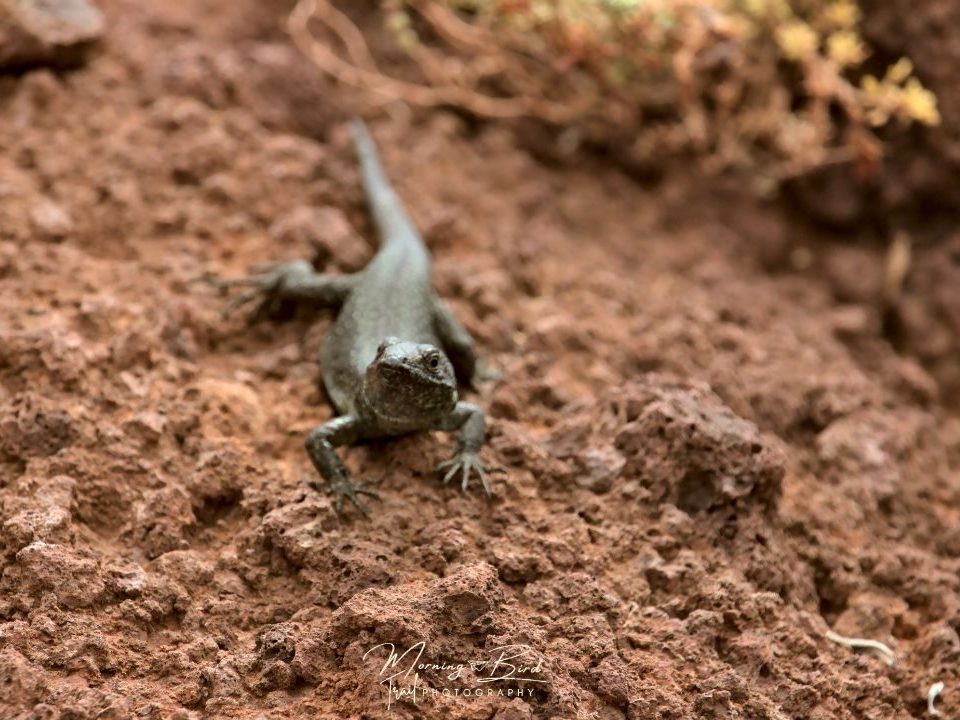
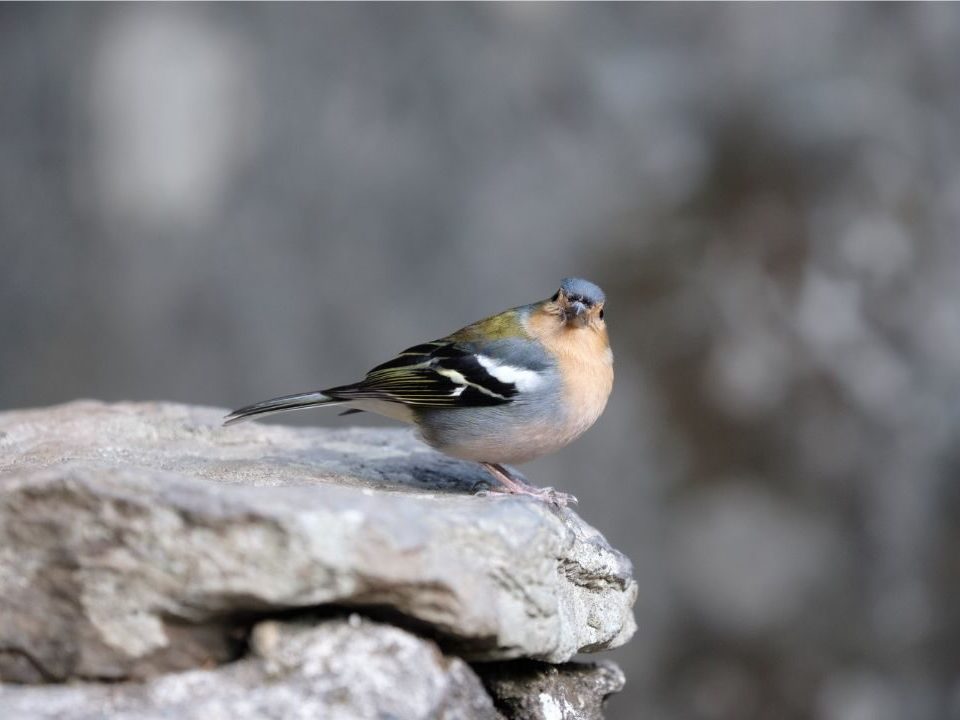
Another thing that you should expect here (but also in other points of the island) are friendly lizards on every rock. These lizards are used to people, and if you give them food or water, they’ll be happy around you, posing for photographs.
You should also expect quite a few people since this is one of the most famous hikes on the island. This may be more problematic in parts of the trail where you want to appreciate the view (and you would like to do so without people) but they just want to keep going and you feel you feel obligated to do the same.
What are the Highlights of Ponta de São Lourenço hike?
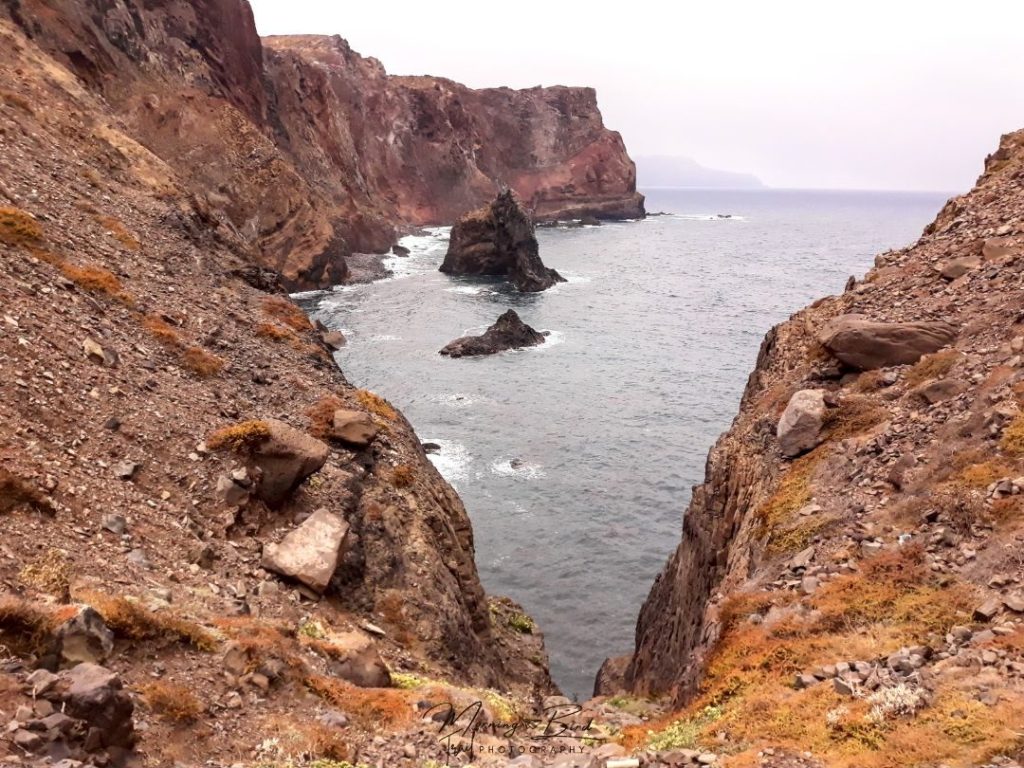
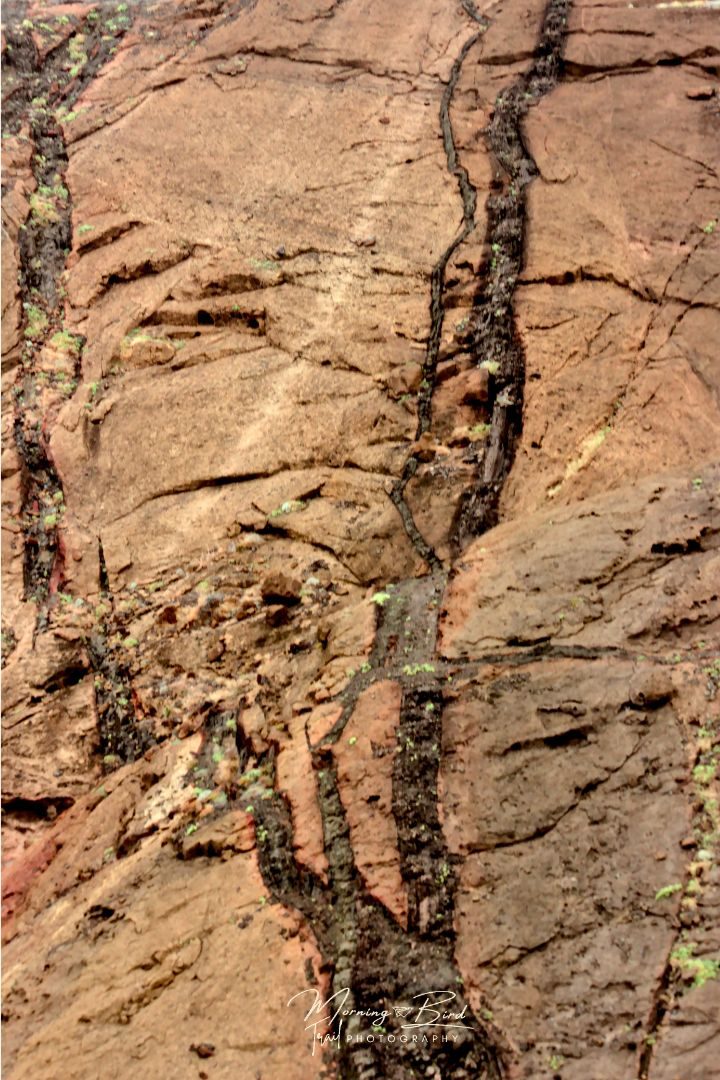
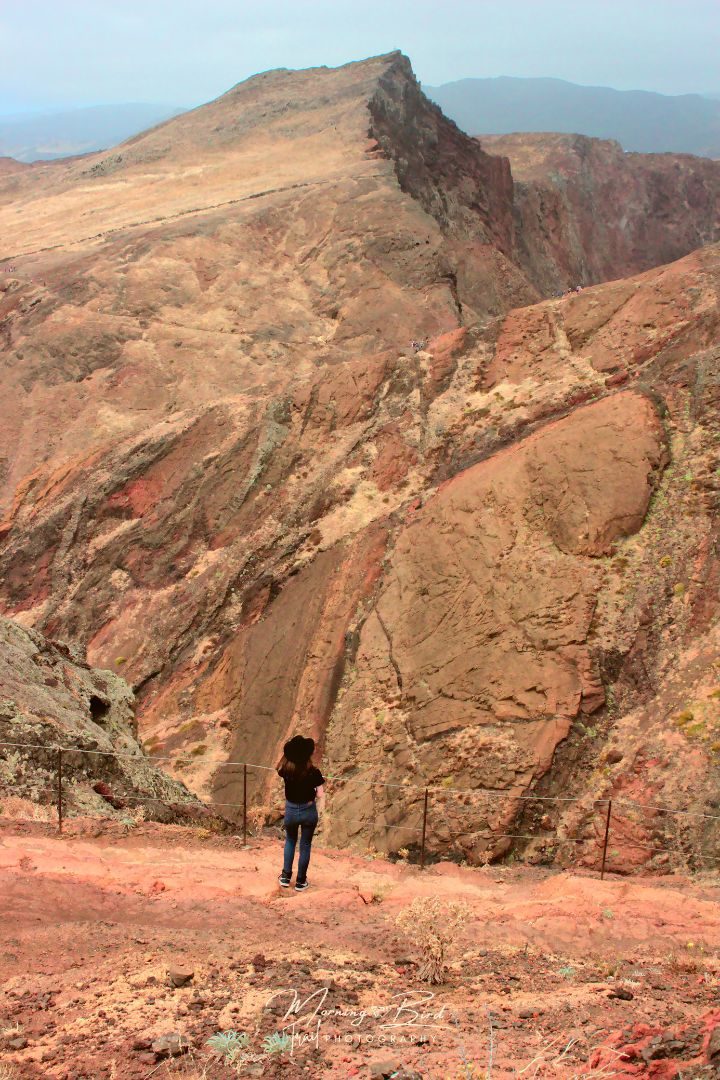
The highlights of this hike are the incredible views of the volcanic rocks. Every time that you get to a new section of the hike you are more amazed by the landscape. Every rocky formation against the sea is spectacular. In some places, you can even see vertical regions on the rock that are different from the rest and it seems like lava once fallen in those places until it reached the sea.
Another highlight is the top of the Miradouro Ponta do Furado viewpoint where you can see Ponto Santo (if the weather lets you) and the desert islands. This part of the hike is not part of the official PR8, and at the bottom, there is a sign that says that it is dangerous. Despite that, many people keep following this route to see the beautiful viewpoint. The sign is there to indicate that this part of the route is not being maintained as you can see for the degradation of the stairs and handrail. This is what makes this part of the route that dangerous.
2 – PR1: Pico do Arieiro to Pico Ruivo
- Key details about the Pico do Arieiro to Pico Ruivo hike
- How to get to Pico do Arieiro?
- What is the best time to hike Pico do Arieiro to Pico Ruivo?
- What should you expect in the Pico do Arieiro to Pico Ruivo hike?
- What are the highlights of Pico do Arieiro to Pico Ruivo?
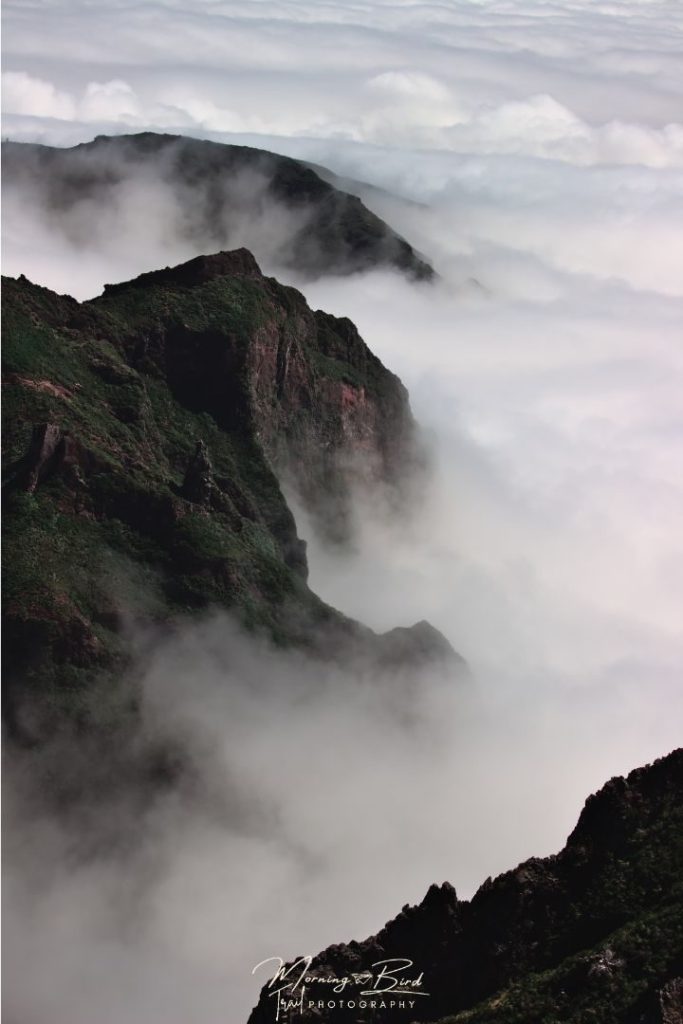
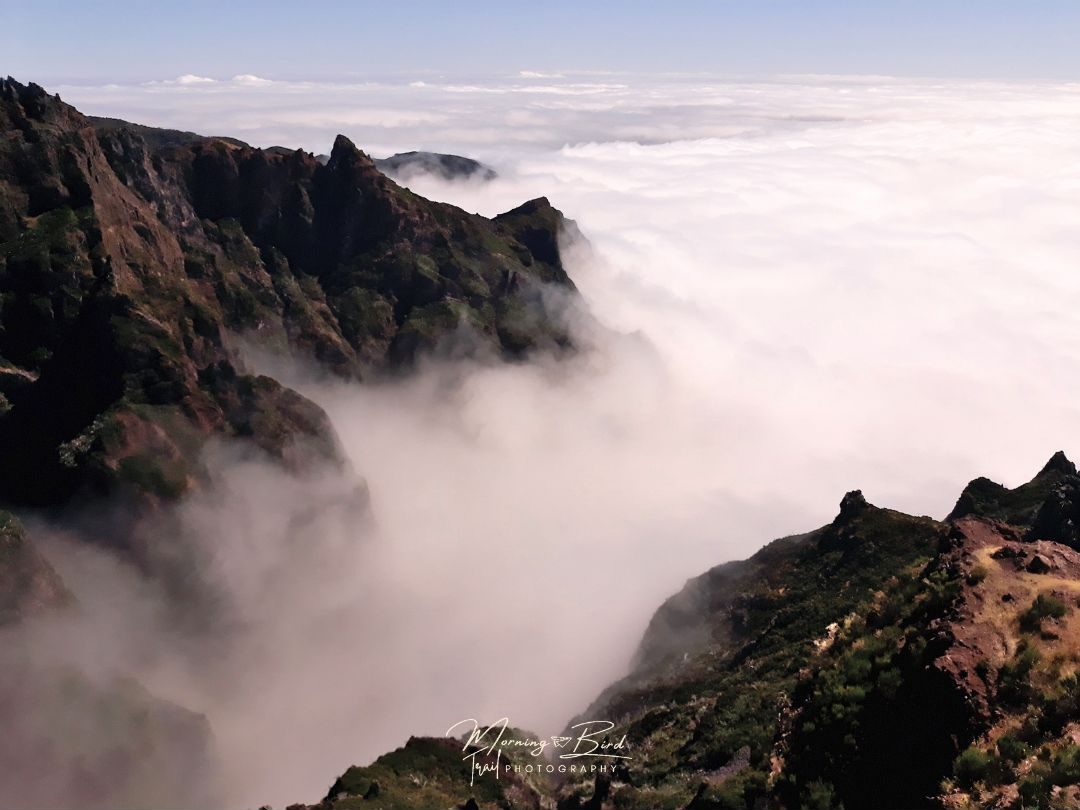
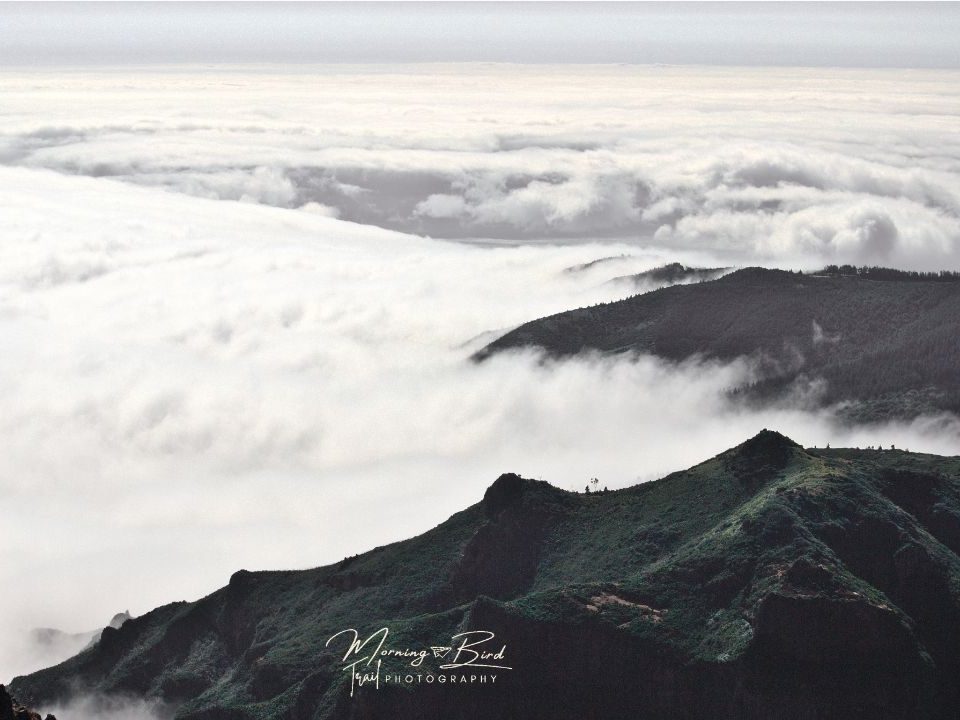
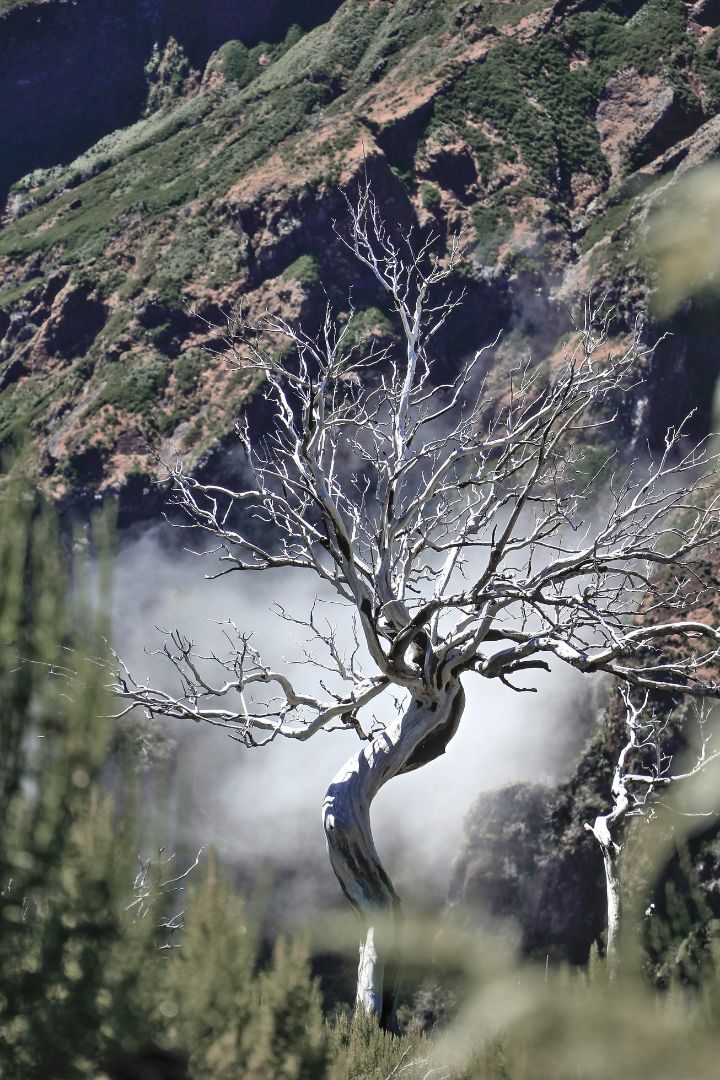
In this hike, you’ll be on the highest peaks of the island, very likely above the clouds with peaks all around you piercing the clouds. The views will be stunning and memorable, and even the tiresome will disappear when you look around (okay, maybe not but you’ll feel happy to be proving that you can hike the hardest hike on the island).
Key details about the Pico do Arieiro – Pico Ruivo hike:
This hike is a 6 or 7 km one-way hike. This means that the hike can be done in around 3 to 4 hours. The big problem with this math is that this isn’t a simple hike and you’ll be going up and down, and up and down, several times.
The worst part about this hike is that as soon as you get to the end…. you’ll have to go back the same way because you left your car at the beginning… Which means that you’ll have to go up and down, and up and down, all over again.
If you get to the end and feel like you don’t want to walk anymore, which is quite likely, I have a few ideas that may help you:
- you can get a taxi to go back to Pico do Areeiro (which will be expensive, around 70€ for one hour drive)
- or you can leave one of the persons in your group behind, near the tunnels section of the hike. Doing so will let them get the car and pick you up in Pico Ruivo (which may not be a good option if everyone in the group wants to experience the hike).
- Another option is to not complete the hike and near the tunnel section, coming back. If both sections are opened, you can even walk different paths.
- One last option is to not walk this trail at all and instead hike the PR1.2, Achada do Teixeira to Pico Ruivo. This is a 3 km (one way) hike that will take you from Achada do Teixeira, where you can park, to Pico Ruivo and can be done in around 2 hours. This is a way easier and more flat hike than PR1.
The hike is quite hard, especially if you opt to do the circular way. The hike is hard especially because of the differences in altitude along the way and the stairs that you have to go down and up several times. Make sure you have confortable hiking shoes!
This is one of the most famous hikes on the island, and you’ll see many people attempting to “conquer the peaks”. Another benefit of its fame is that the trail is quite well maintained. There are handrails in strategic places, and the floor is covered by stones placed by humans. There are still some places without handrails. These parts may look scary, especially for people afraid of heights.
There are tunnels that you’ll need to cross (a higher number if you follow the west side after the first one). These tunnels may be dark, so a torch or your phone may be useful to avoid injuries.
Even though you’ll be almost 2000 meters above sea level, the temperature may be quite high. Thus, if you start hiking later than sooner, you may have problems with the heat. This is especially true if the clouds are below you and the sun hits you directly. Because of this is important to use a hat to protect your head, sunscreen to protect your skin and drink plenty of water (that you should bring with you).
To do these hikes is important to check the webcams to see how the weather is up in the mountains. You can do that on this website.
How to get to Pico do Arieiro ?
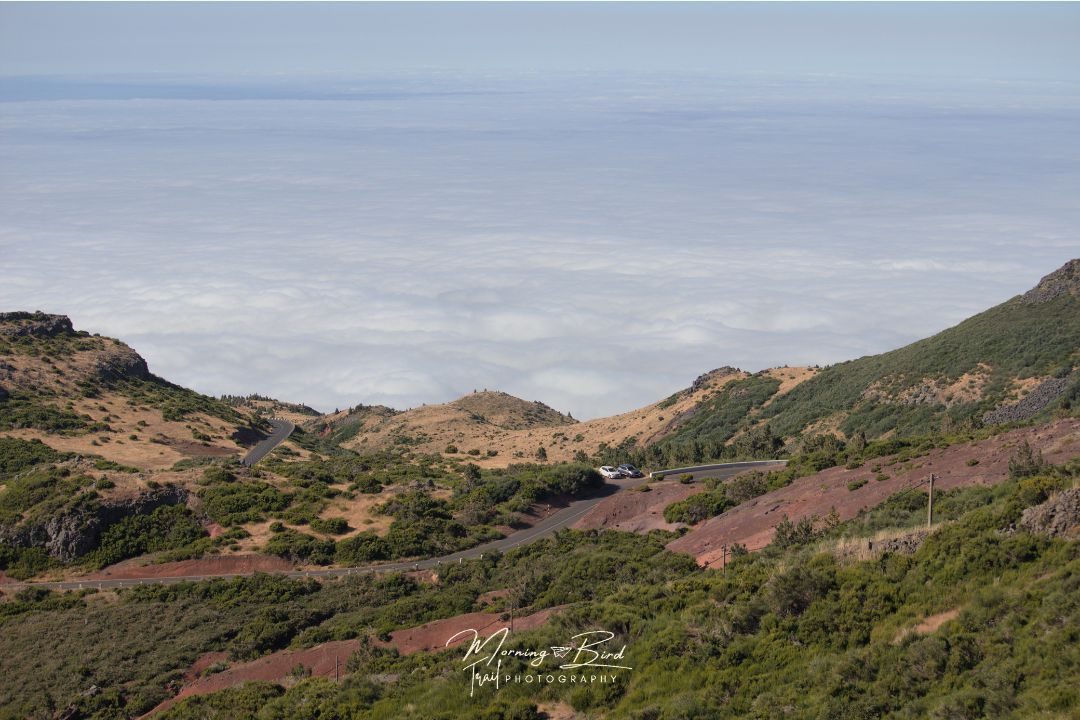
The best way to start the hike is from Pico do Arieiro. To get from Funchal to Pico do Arieiro, you’ll spend 45 minutes driving (if you rented a car). This is important to consider if you want to reach the peak early or at a specific hour. In Pico do Arieiro there is a big parking lot, bathrooms (paid), souvenirs and a coffee shop. You can also use a transfer to the begining of the hike.
The parking lot is big, but because this hike and Pico do Arieiro (even if not for the hike) are so famous, the parking lot gets full quickly. After 10 am probably the parking lot will be full and people will start to park on the road. The road is also inclined (since we are in a mountain) so the later you get there, the more you have to climb.
There is also a second road, on your left, that ends in a roundabout where you may try to park. This road has direct access, near the roundabout to the building and also another viewpoint on the left.

What is the best time to hike Pico do Arieiro – Pico Ruivo?
When choosing which is the best moment to hike to Pico Ruivo from Pico do Arieiro, you should consider how is the weather, when do you want to go and what month are you in.
Because of how amazing the view is in a golden hour you may consider going there at sunset or sunrise. The advantage of going at these times is also that the heat is not as intense as it would be at mid-day. The experience in mid-day will be different but beautiful as well.
As for the time of the year, sometimes in the winter, the peaks may have snow, and the trails are closed. In the Spring and Autumn, the weather is a bit less hot than in the middle of the Summer, which can be more comfortable to hike. In the Spring, you may also see flowers on the floor, making the hike even more magic.
What should you expect in Pico do Arieiro – Pico Ruivo hike?
You should be prepared to climb A LOT of stairs. You will also be between big peaks around you, so the views will most likely be incredible.
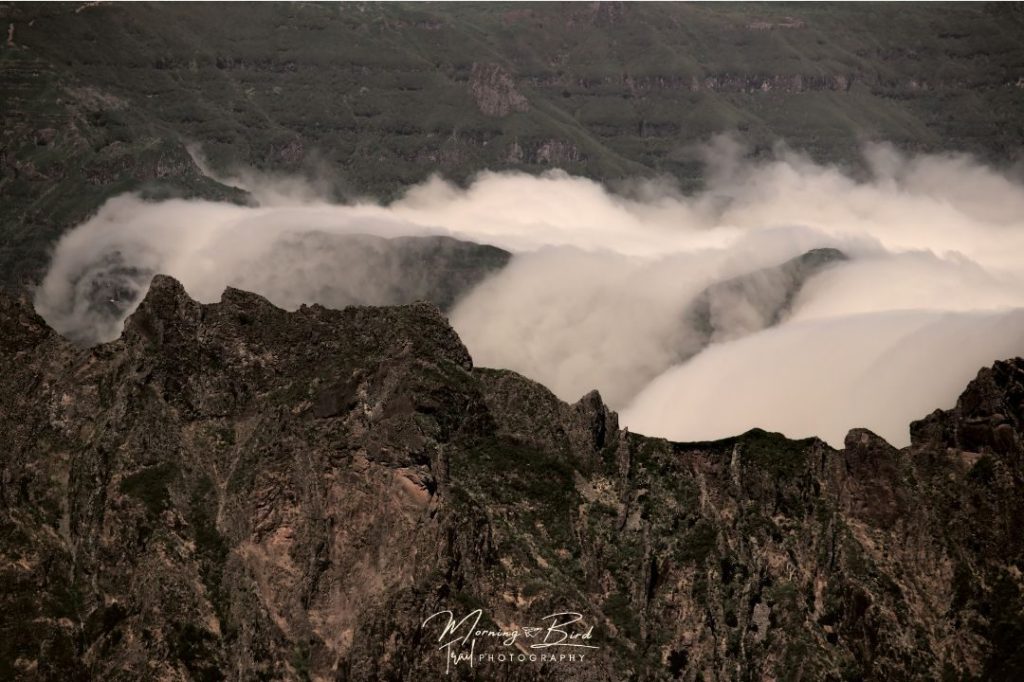
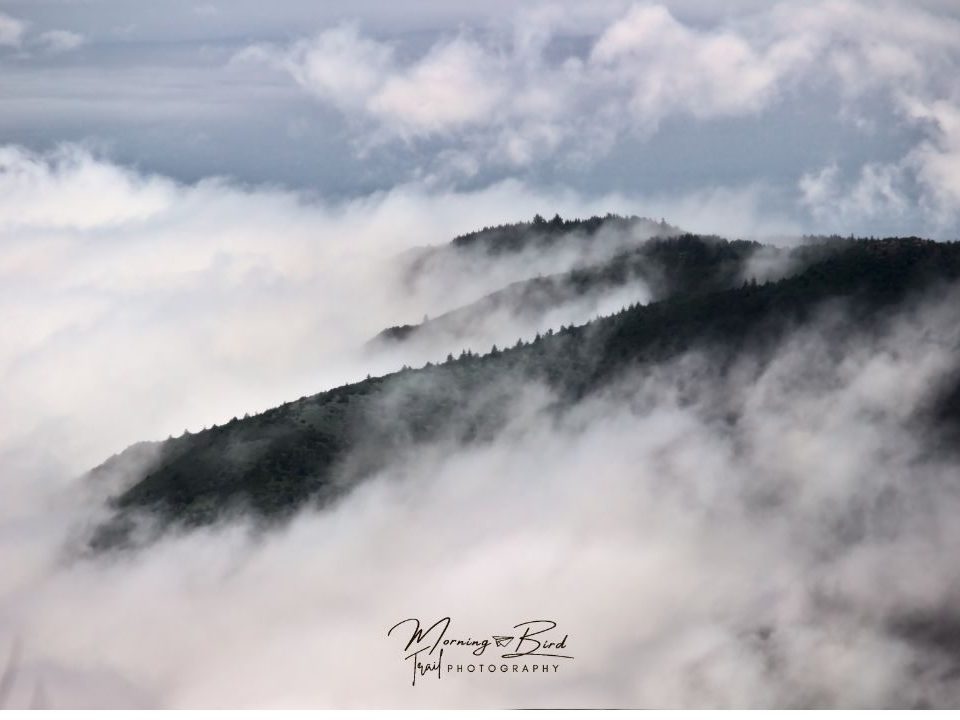
Something else that makes the views incredible and the hike magical is the clouds may be below you. These clouds are in constant change and, while you rest, you can see them change. You can see them sometimes stuck in a bigger peak and suddenly able to pass above it and creating a sort of white waterfall of clouds.
What are the Highlights of the Pico do Arieiro – Pico Ruivo hike?
The landscapes are the major highlight. As a result, there are several viewpoints on the hike.
The first of these viewpoints is the Ninho da Manta viewpoint. This is close to the first kilometre of the hike and is a popular viewpoint for the peaks and the clouds.
After a bit more walking, you will get to Pedra Rija, a part of the hike where you will be walking on the ledge of the mountain (you will have handrails to feel more secure and help your hiking). This may be a bit scary, especially if you are scared of heights, but the trail is safe, and you’ll have the help of handrails to relax your mind a little bit.
Another highlight of the hike is the tunnels that come after Pedra Rija. Because this is Madeira, everything has tunnels, and this hike is not an exception. There is only one mandatory tunnel and five in total if you chose to hike the west side of the trail. From these tunnels, the mandatory one is medium, the next two are big and the last two are small (regarding length).
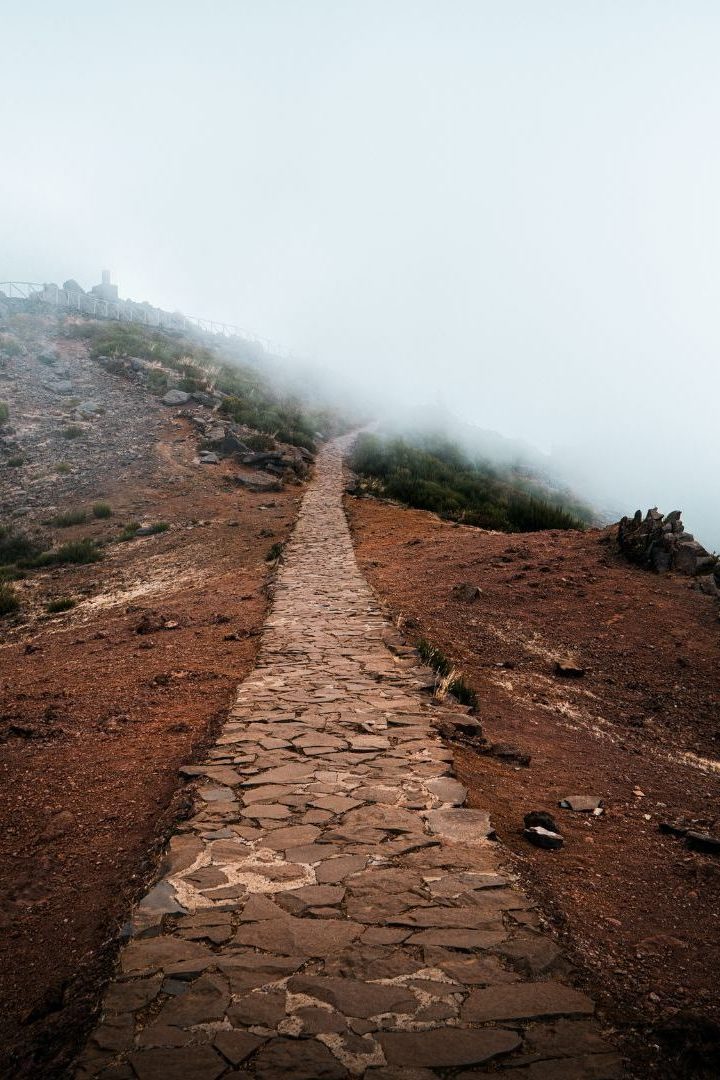
After the tunnels, you will find A LOT more stairs to climb… Some of them are so steep that they seem to be almost vertical. On top of these stairs, you can have an amazing 360º view of all the peaks around you.
After these stairs, you’ll find a magic scenery of photogenic silver-white trees.
The next step is to get to the top of Pico Ruivo. That seems easy… it isn’t because you still have to climb a bunch more stairs that may take a while. After reaching the peak you can go to Achada do Teixeira (through PR1.1) to get a taxi or if you have someone waiting for you. If you chose the other option, after getting to Pico Ruivo, you have to hike back to Pico do Areeiro.
3 – PR6: Levada das 25 Fontes
- Key details about the 25 Fontes hike
- How to get to the 25 Fontes hike?
- What is the best time to hike 25 Fontes?
- What should you expect in the 25 Fontes hike?
- What are the highlights of 25 Fontes?
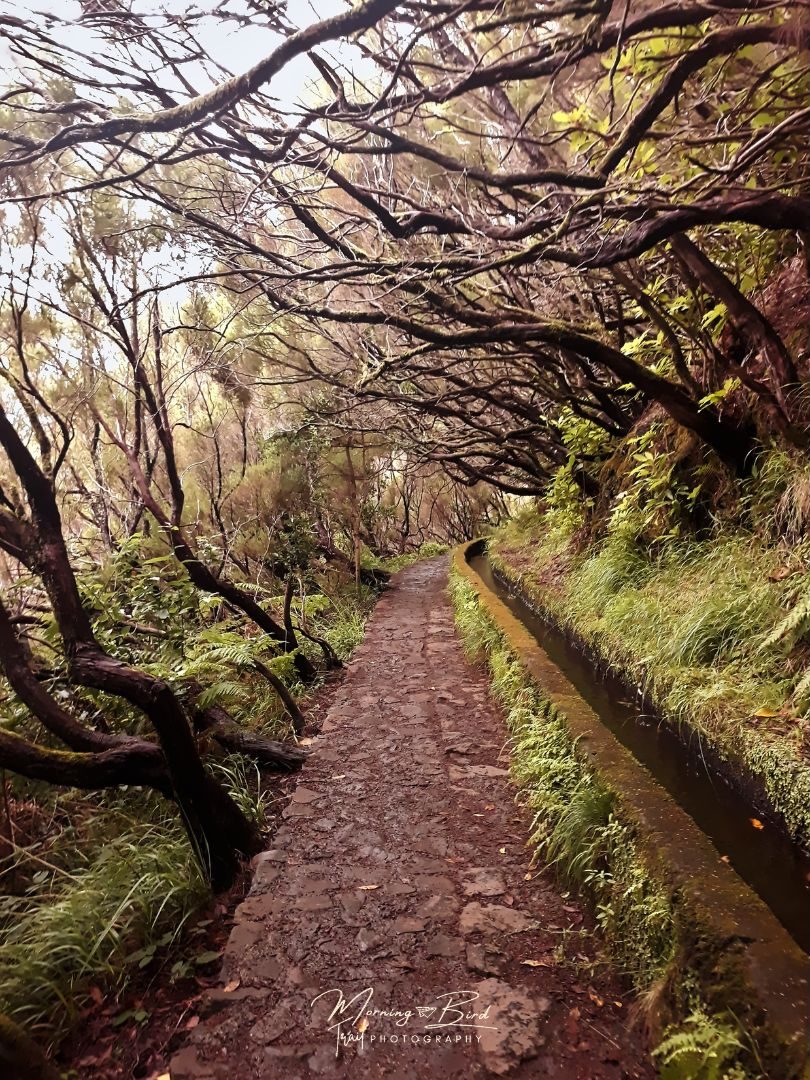
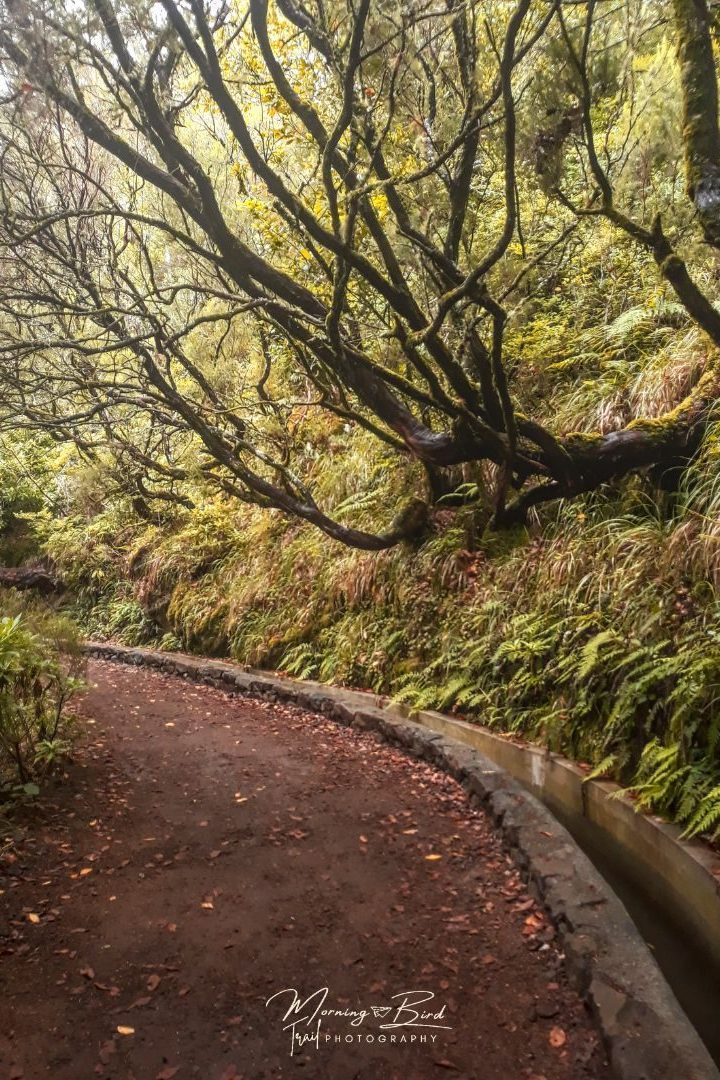
This is a beautiful and popular hike through the Laurissilva Forest of Madeira, a UNESCO World Heritage Site. In this hike, you can see amazing waterfalls and refreshing landscapes. This hike mostly follows a Levada. A Levada is an irrigation channel that moves water, usually from the northern part of the island to the south. Has an interesting fact, some of the water on the Levada is also used to create energy.
Key details about the 25 Fontes hike:
This is a pretty big hike, having almost 5 km each way (more 0.8 km each way if you want to also go to Risco waterfall). The walk may take you 3 to 4 hours to complete, depending on how many stops you make. However, you can easily spend an entire day around the area because there are so many different trails in there (be careful and don’t adventure in unmarked trails).
The hike is easier than the two previous ones even though there are quite some stairs. This is something different from other Levadas, such as Caldeirão Verde, despite being longer they may be easier because they are flatter.
If you start hiking at Rabaçal, it will start with a huge 2km steep drop that you will eventually need to climb up again. These first (or last) 2km, however, don’t need to be walked, because there is a mini-bus that every 25 minutes can drive people to the Rabaçal House. Here you’ll have a bathroom and a coffee shop. Near the house, there are also trash cans so you won’t have any excuse to leave trash on the nature. The prices of the mini-bus, as of now, are 3€ one way, 5€ return, per person.
The hike is mostly done below the shade of trees which make it quite refreshing. The only part that is not much covered is the initial 2km. Thus, depending on the weather conditions it may be cold or warm in that part.
How to get to 25 Fontes?
The 25 Fontes hiking trail starts at Rabaçal, less than 1 hour away from Funchal (if you rented a car). At the beginning of the trail, you’ll find a dirt parking lot where you can park your car and either start your hike downhill or wait for the mini-bus that gets you to Casa do Rabaçal.
What is the best time to hike 25 Fontes?
Because of the popularity of this hike, the best time to hike the 25 Fontes Levada is early in the morning. This way there won’t be many people in the opposite way, in the tighter parts of the route. Another advantage is that the earlier you start, the quicker you’ll get to the waterfall, and the more likely it is for you to have all the space for yourself.
Another thing to keep in mind is that the waterfalls are stronger when there is rain. As a result, the landscape will change depending on the season.
What should you expect from 25 Fontes hike?
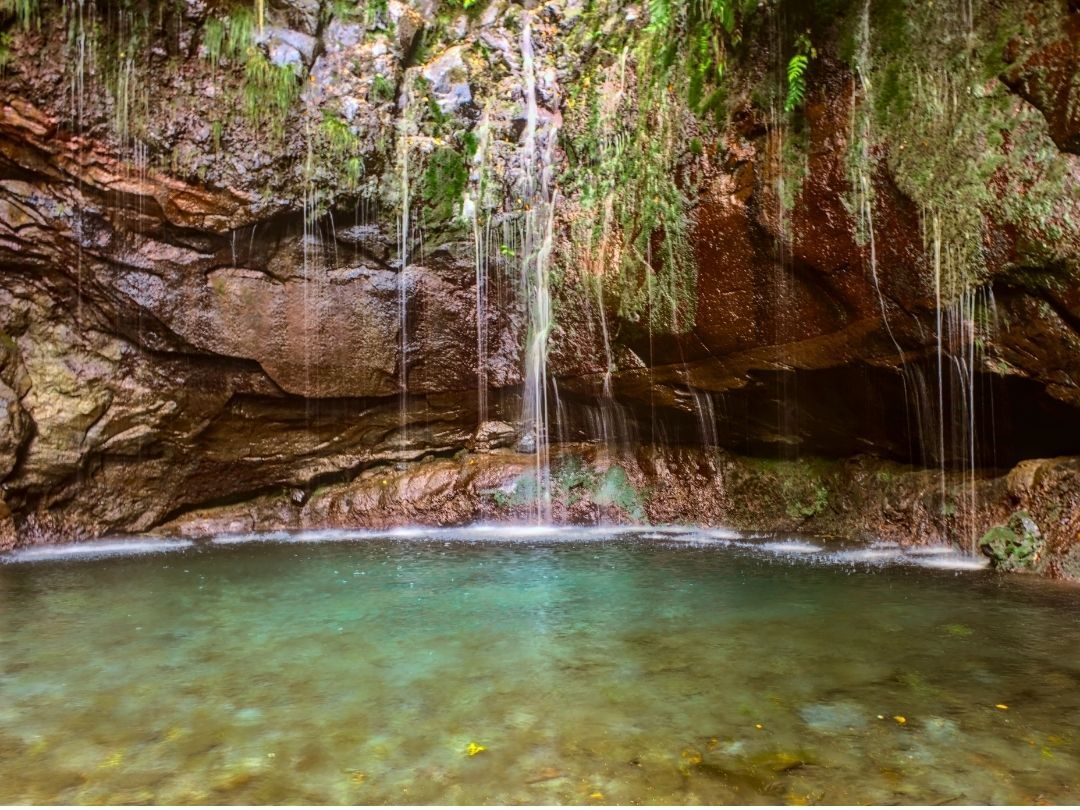
As mentioned above, your expectations should be quite different depending on the season. In the Summer, you’ll be able to see small streams of water falling close to the rock behind, and maybe count all the 25 “fountains” that give the name to the waterfall. In the winter, you should expect a stronger and more impressive stream of water, especially after rainy days.
Something that you can expect regardless of the season is the greenery that will involve you every step of the way. Since you are in a Laurissilva Forest, you’ll be amazed by the beautiful trees and their contorted branches.
Regarding the walk itself, you should expect many stairs (less than in the previous two hikes but still some) and very tight parts of the route. These parts may be more dangerous, and inclusive people have died in this hike. However, there are handrails and the main trail is well maintained. The handrails could be a bit safer if they had another wire at the bottom, but it still protects a lot.
You should also be expecting to find many branches of the trees over the path that you are following. This is beautiful but sometimes they are quite low and you may hit your head in there if you are not paying attention.
Another thing that you can expect is the coldness of the water. The water in the Levadas and the lake at the bottom of the waterfall is really cold, so you may not want to enter the lake. On the other hand, you may feel like that water is perfect after a long hike if you are brave enough.
What are the Highlights of the 25 Fontes hike?
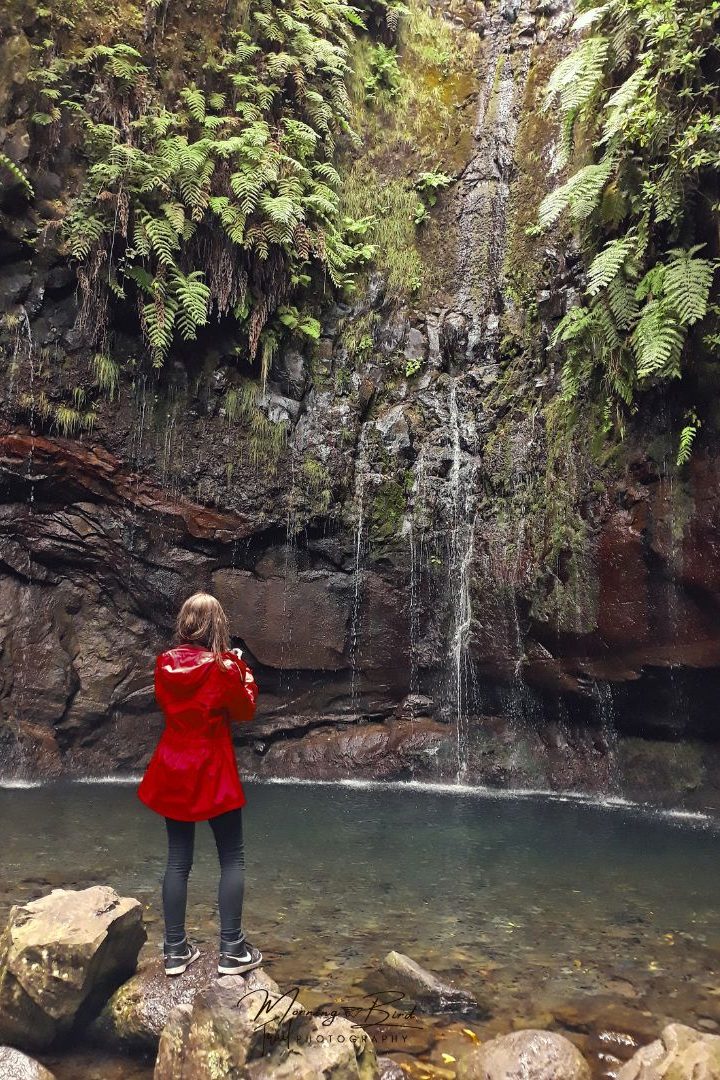
The major highlight of this hike is the 25 Fontes waterfall. This is a beautiful waterfall and lake surrounded by rocks and a Laurissilva forest. The waterfall is unique because it is made of little streams (in the Summer, that was when I went there) around the lake. Because this waterfall is such a highlight in one of the most famous hikes in Madeira, the surroundings of the lake can become quite full of people (especially because there isn’t much space outside the water) trying to get the perfect picture. This is also one of the reasons why it is a good idea to come as early as possible.
Another highlight is the Risco Waterfall if you choose to see it. This is a high waterfall, with around 100m, that may be underwhelming in the Summer because it will very likely have not much water. In the winter, however, the waterfall is super strong and wonderful.
The forest itself is also a highlight. The Laurissilva forest is a UNESCO World Heritage Site, and for a good reason. The trees all around you with so unique shapes create a beautiful and magic atmosphere around you.
If you loved and felt inspired by these hikes and are interested in knowing more about Madeira you can check my 7 days itinerary in Madeira Island. If you want to feel even more inspired, feel free to read about one of the most beautiful and magical places in Madeira, in this post about the Fanal Forest.
In case you are wondering, all these pictures were taking with the following equipment:
- Canon EOS 90d
- Samsung SD card
- Canon EF 50mm F1.8 STM
- Canon EF-S 55-250mm F/4-5.6 is STM
- Canon EF-S 10-18mm F/4.5-5.6 IS STM
- K&F Concept K-Serie 67mm ND Filter
- Samsung Galaxy A52 5G
Here are other plog posts that you may like to read:

How to visit Machu Picchu: Tickets, Timing & Travel Tips
Planning a trip to Machu Picchu? From choosing the best time to visit to knowing exactly what to pack, this guide covers everything you need for a smooth and unforgettable experience.

Rainbow Mountain in Peru: How to Prepare for This Epic Hike
Learn how to prepare for the Rainbow Mountain hike in Peru. From altitude tips and gear to trail insights, discover how to fully enjoy this breathtaking Andean adventure.

The Sacred Valley of the Incas: Ollantaytambo, Moray & More
A short way from Cusco you’ll find what is known as the Sacred Valley. When driving through this region, you’ll see beautiful snow-capped mountains, inca terraces, and ancient ruins – that some argue even more impressive than Machu Picchu. Typically, the Sacred Valley is just a stop on the way to Machu Picchu, but it…

Great post, thank you!
LikeLike
Thank you! I’m glad you enjoyed it and that it helped you and inspired you!
LikeLike